Agentless Secure VPN (OpenVPN and Mullvad) via Kasm Workspaces Container Streaming Platform

In today’s world of cyber attacks, ransomware, viruses and general online evil-doers I have gone to great lengths to keep myself and my customers safe. I work in the world of data center IT. As such, I remote into platforms and search the web for solutions to problems clicking into many websites and taking the chance that malware will compromise my workstation.
Recent events (JBS, Colonial, JISD) have made the use case for remote browsing and Container Streamed VDI undeniably powerful. Being able to simply destroy a containerized desktop if infected with Malware and spin up another one can protect you from being the next ransomware victim.
Now that our work-from-home workforce is expanding I have found a need to expand our secure container image offerings to include the ability to VPN in the office or for our traveling force to sometimes attach to an anonymizer to geolocate my source address within the required geofence.
In this blog I’m going to show you how to get up and running with Kasm Workspaces. I’m going to run through:
- Installing OpenVPN on one of the standard desktop images and then we are going to connect to NordVPN.
- Modifying the first example slightly and connecting my favorite location VPN service — Mullvad VPN.
Both of these can be modified slightly to connect to your business VPN service.
- Download the latest Kasm software and run the installation instructions. The installation instructions are very detailed and easy to follow.
- Pull the docker pull kasmweb/ubuntu-jammy-desktop:1.11.0-rolling image and install openvpn — This example connects you to NordVPN.
My Dockerfile:
FROM kasmweb/ubuntu-jammy-desktop:1.11.0-rolling
USER rootENV HOME /home/kasm-default-profile
ENV STARTUPDIR /dockerstartup
ENV INST_SCRIPTS $STARTUPDIR/install
WORKDIR $HOME######### Customize Container Here ############ Install OpenVPN
RUN apt-get update && \
    apt-get install -y openvpn# Copy the NordVPN OpenVPN connection profiles
RUN cd /etc/openvpn && \
    wget https://downloads.nordcdn.com/configs/archives/servers/ovpn.zip && \
    unzip ovpn.zip && \
    rm ovpn.zip######### End Customizations ###########RUN chown 1000:0 $HOME
RUN $STARTUPDIR/set_user_permission.sh $HOMEENV HOME /home/kasm-user
WORKDIR $HOME
RUN mkdir -p $HOME && chown -R 1000:0 $HOMEUSER 1000
The important parts above are:
RUN apt-get update && \
   apt-get install -y openvpn
This installs OpenVPN onto the container.
RUN cd /etc/openvpn && \
    wget https://downloads.nordcdn.com/configs/archives/servers/ovpn.zip && \
    unzip ovpn.zip && \
    rm ovpn.zip
The code above downloads a zip file full of ovpn files. Each file is a NordVPN server in a different location. When you run the command later in this Blog you will see that I arbitrarily decided to use md13.nordvpn.com.tcp.ovpn. Feel free to use any of the NordVPN Servers.
Then build the container:
docker build -t custom:nordvpn -f Dockerfile .Point your browser to https://localhost or where ever you have your Kasm instance running.
- Click on “Admin”
- “Images” on the left panel.
- Select the “+ Add Image” button
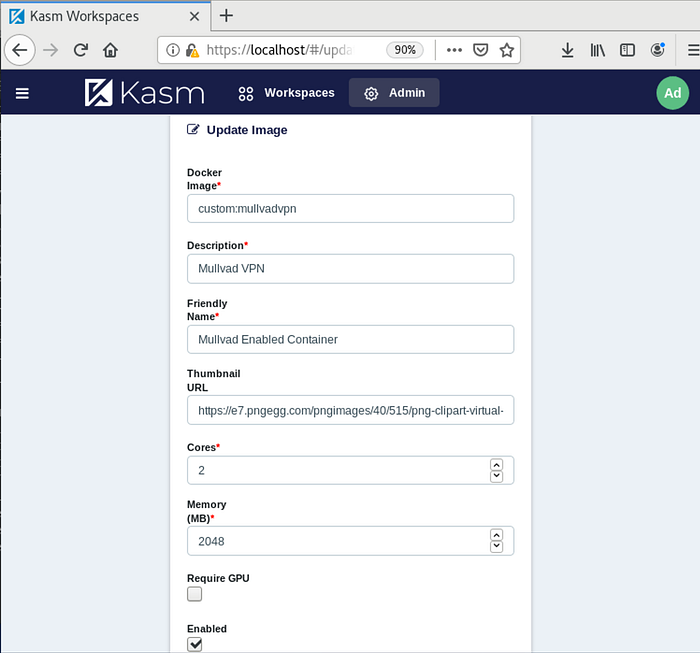
An example of what you would want to fill in:
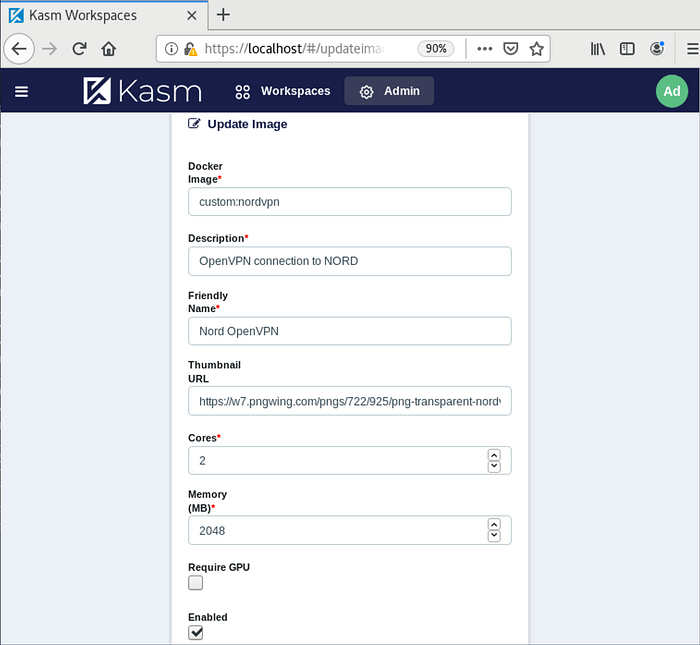
Note: Make sure the “Enabled” check box is checked or you won’t be able to run your image.
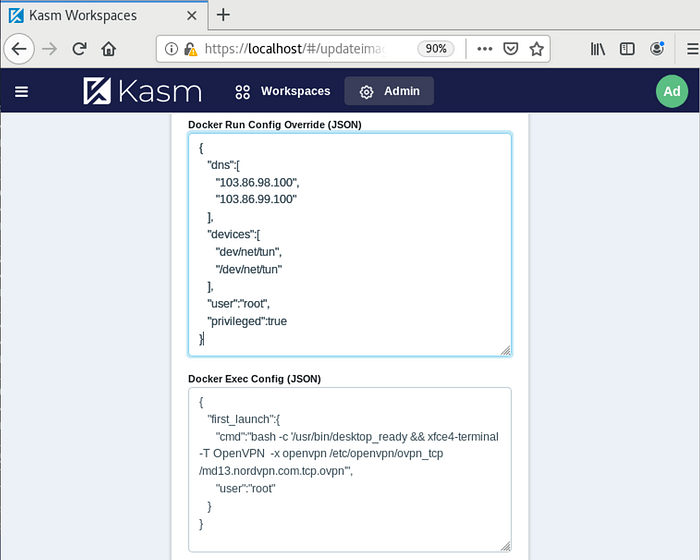
- Override the Docker Run Config:
{
   "dns":[
      "103.86.98.100",
      "103.86.99.100"
   ],
   "devices":[
      "dev/net/tun",
      "/dev/net/tun"
   ],
   "user":"root",
   "privileged":true
}
You need to run the container in privileged so that you can modify the network stack when the VPN is attempting to connect. We provide the container the Nord DNS servers.
Override the Docker Exec Config:
{
   "first_launch":{
      "cmd":"bash -c '/usr/bin/desktop_ready && xfce4-terminal -T OpenVPN  -x openvpn /etc/openvpn/ovpn_tcp/md13.nordvpn.com.tcp.ovpn'",
      "user":"root"
   }
}
In the Docker Exec Config we tell the container to execute using the .ovpn file provided by nord. This file can/should/will be replaced by the ovpn file provided to connect to the desired endpoint. If you have your ovpn file on your host system, lets say in /tmp/client1.ovpn, then you can add the following line to your Docker file and then modify the Docker Exec accordingly.
COPY /tmp/client1.ovpn /etc/openvpn/client1.ovpnBelow is what the Overrides should look like in Kasm.
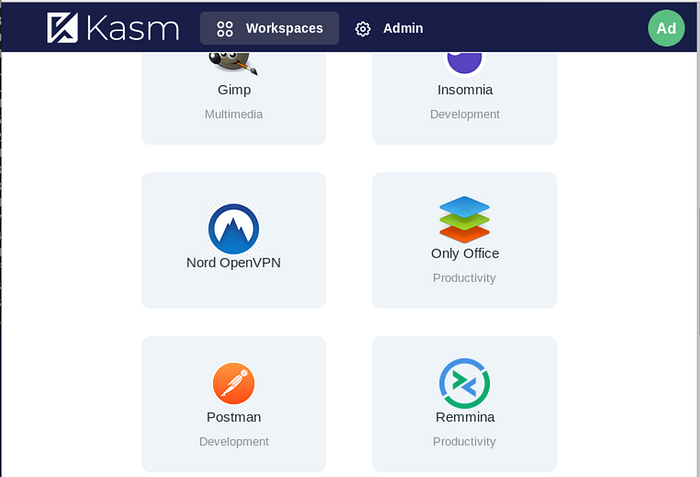
Click the “Submit” button. Then select “Workspaces” from the top menu.
Now we can see our image in the Workspaces dashboard.
Run the image you just created by clicking on the image panel and then “Launch Session ->”. Upon startup it will automatically connect to Nord.
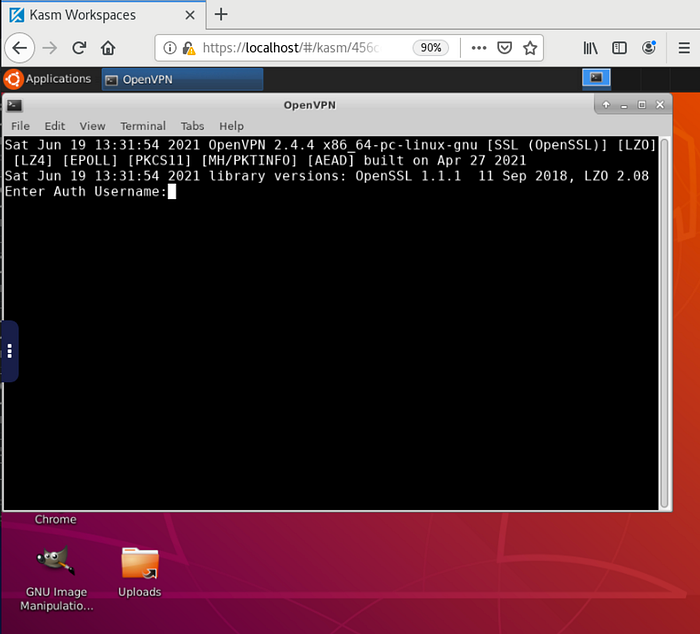
Enter your user name a PW and Password and you are VPN connected. Go to nordvpn.com. If the connection is successful, the bar at the top of the page should say that your status is Protected.

I’m going to approach Mullvad VPN a little differently than Nord. What you’ll see is that the main difference in how I get the files into the container.
- Note: Mullvad VPN utilizes IPv6 by default however, IPv6 is turned off by default in Docker versions newer than 17.03.1. We will need to modify the .conf file to ensure functionality. If you want to enable IPv6 on your container then you can ignore the part where we modify the .conf file.
- Follow the instructions on this Mullvad install page. The primary task you need to complete here is going to the Configuration files page. It is here that you will need to have your account number and then choose your country and location you wish to connect to. Once you have made your selections you will download a .zip file and then unzip that file. I have a folder called mullvad/files and in that folder you should see:

I have chosen Denver, Co, USA as my location of choice. Now open the .conf file and find the line “dev tun” and add the following right under that line.
pull-filter ignore "dhcp-option DNS6"
pull-filter ignore "tun-ipv6"
pull-filter ignore "ifconfig-ipv6"
Save your .conf file and now we move on to the Dockerfile.
My Dockerfile looks like the following:
FROM kasmweb/ubuntu-jammy-desktop:1.11.0-rolling
USER rootENV HOME /home/kasm-default-profile
ENV STARTUPDIR /dockerstartup
ENV INST_SCRIPTS $STARTUPDIR/install
WORKDIR $HOME######### Customize Container Here ############ Install OpenVPN
RUN apt-get update && \
   apt-get install -y openvpn && \
   mkdir /run/openvpn# Copy Mullvad files
COPY files/mullvad_ca.crt /etc/openvpn/mullvad_ca.crt
COPY files/mullvad_us_den.conf /etc/openvpn/mullvad_us_den.conf
COPY files/mullvad_userpass.txt /etc/openvpn/mullvad_userpass.txt######### End Customizations ###########RUN chown 1000:0 $HOME
RUN $STARTUPDIR/set_user_permission.sh $HOMEENV HOME /home/kasm-user
WORKDIR $HOME
RUN mkdir -p $HOME && chown -R 1000:0 $HOMEUSER 1000
This is very similar to the OpenVPN Dockerfile. The primary change here is the three lines:
COPY files/mullvad_ca.crt /etc/openvpn/mullvad_ca.crt
COPY files/mullvad_us_den.conf /etc/openvpn/mullvad_us_den.conf
COPY files/mullvad_userpass.txt /etc/openvpn/mullvad_userpass.txt
You’ll notice that these are copying the three files that you have in mullvad/files in the container image and dropping them in the /etc/openvpn directory. You can change this directory as you want but don’t forget where you drop them, you’ll need them in a minute.
Next we want to build our image much like we did above:
docker build -t custom:mullvadvpn -f Dockerfile .We are going to go back to the Kasm Workspaces WebUI and again go to Admin->Images->Add Image.
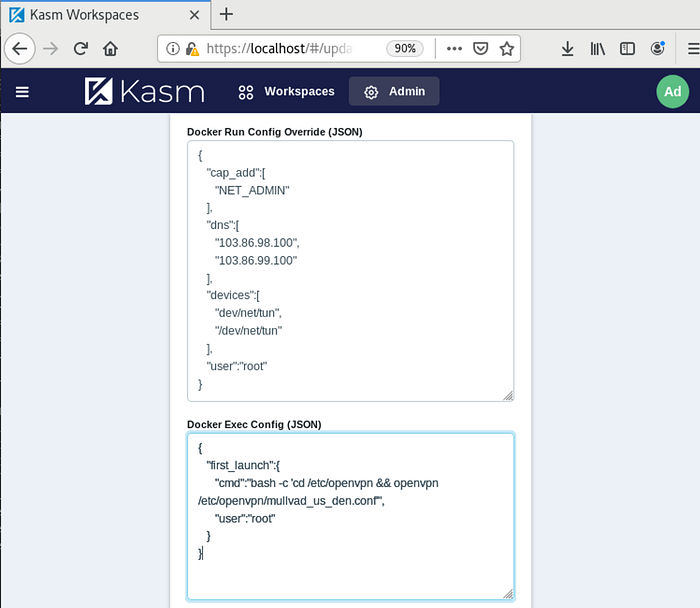
Override Run Config — This looks a lot like the NordVPN run override:
{
   "cap_add":[
      "NET_ADMIN"
   ],
   "dns":[
      "103.86.98.100",
      "103.86.99.100"
   ],
   "devices":[
      "dev/net/tun",
      "/dev/net/tun"
   ],
   "user":"root"
}
Override Exec Config — We want to pay attention to this config. I’ll explain below.
{
   "first_launch":{
      "cmd":"bash -c 'cd /etc/openvpn && openvpn /etc/openvpn/mullvad_us_den.conf'",
      "user":"root"
   }
}
Notice the change directory command above dropping us into /etc/openvpn. We add the change directory command because openvpn is fed the .conf file but then tries to read both the .crt and .txt files we transferred earlier and it expects those files to be in the directory that the openvpn command was executed in.
Again hit the “Submit” button here. Now go to the Workspaces dashboard again and we will see out new Mullvad image. Mine happens to be sitting right next to my NordVPN image.
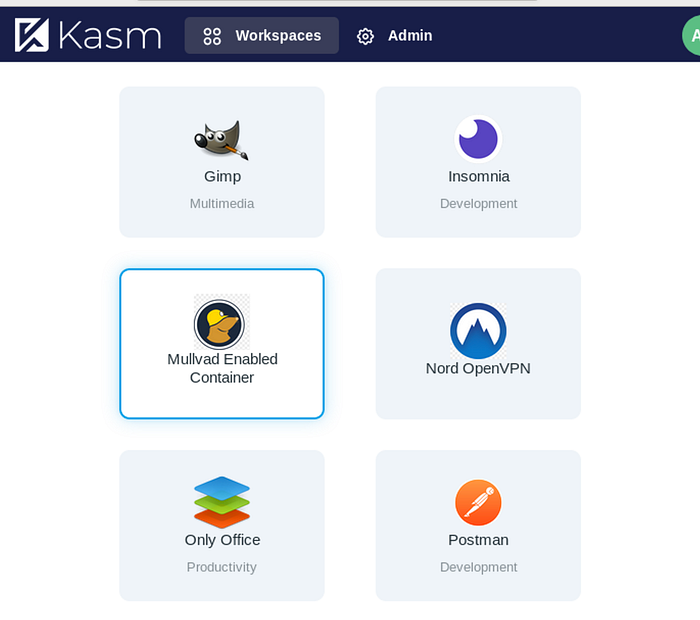
Now just like before click on the image and then “Launch Session”. Once the session loads it will be connected to the Mullvad VPN originating in Denver Co. You can confirm this by running:
curl https://am.i.mullvad.net/connectedIf everything has been completed correctly you will see:

Now you and your business [vpn] connections are safe and secure.
This article was updated on 10/20/2022 to reflect the latest software versions and procedures.